Mask Organizer DIYs
Normally, I prepare for the new school year by ordering school supplies and crafting first day of school signs for the kids. This year, I’m adding face masks and a mask organizer to my back to school project list. Here are some easy mask organizer DIYs to keep your masks handy by your front door.

Option 1: Command Hooks
In March, our family started wearing face masks. I researched different mask patterns and used fabric from my stash to make a mask for each family member. I placed two command hooks by our front door, so the kids wouldn’t leave their masks lying around the house and wouldn’t forget them when we left the house. If you’re looking for a quick and easy solution, the command hooks are great.
The mask on the left is from Vera Bradley. The mask on the right was made by me using a Cricut pattern. Check out these sew and no sew mask patterns and tutorials.

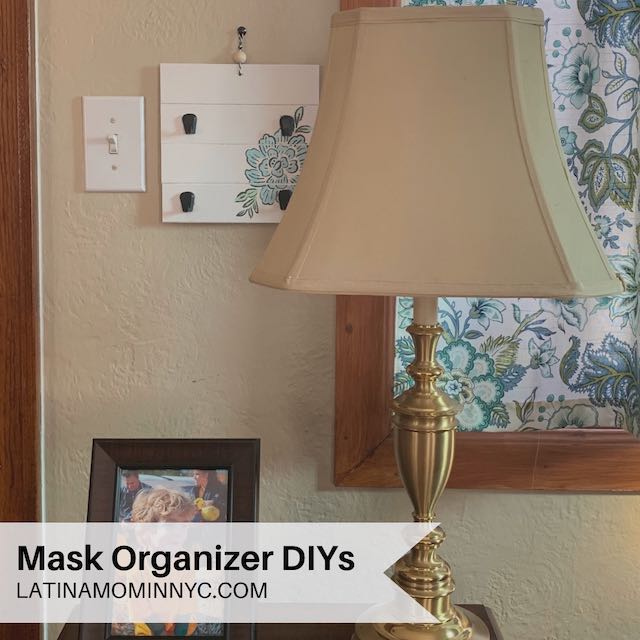
Option 2: Wood Frame Organizer
Five months into the quarantine, each member of our family has multiple face masks. It was time to craft a mask organizer that was functional and pretty, which meant a trip to Michaels (one of my happy places).

To make this mask organizer DIY, you’ll need:
- a wood frame
- adhesive or push pin hooks
- adhesive stencil or permanent vinyl
- paint
- dauber
- twine
- wooden bead (optional)

For this project, I used a floral adhesive stencil from Michaels. I picked colors which match the curtains and decor in my living room. If you have a Cricut cutting machine, you can design your own stencil or add a phrase using permanent vinyl. Get creative and personalize the design to match your style and personality.
Here are the steps I followed to make this orgnanizer.
This mask organizer DIY is a great project for crafters of all skill levels.
- Use a flat head screwdriver to remove the clip from the wood frame.
- Brush the frame with two light coats of paint. Allow each layer to dry between coats.
- Adhere the stencil onto your wood frame. Use an old credit card or scraper to smooth out the stencil. You want to be sure all the edges are smooth and flat to prevent the paint from flowing under the stencil.
- Dip your dauber in paint. Remove excess paint using a paper towel. Lightly dab the paint over the entire stencil. Keep your layers light to avoid bleeding under the stencil. Allow the first layer of paint to dry completely before you add a second layer.
- Carefully remove the stencil while the paint is still wet. Allow the paint to dry before applying the hooks.
- These hooks are push pins; however, the nails were a little long for the depth of my wood frame. I removed the nails using pliers and used Tacky Glue to attach the hooks to the frame.
- I used twine and a wooden bead to create a loop to hang the mask organizer.

This project was a bit of trial and error, but I love the way it turned out. When masks are no longer needed (I’m being optimistic), I can use it as a key organizer or find another use for it. For now, masks are part of our new normal, so we need to find ways to keep them handy and clean.
I wish you and your family continued health,
Jackie
Join the Latina Mom in NYC Group for more crafts, deals and quick shares.
三五笑话
January 23, 2023 at 5:15 am不知道说啥,开心快乐每一天吧!
Clint4258
September 14, 2025 at 4:44 amhttps://shorturl.fm/qef3V
789wim
February 1, 2026 at 7:20 amInteresting read! It’s fascinating how platforms like 789wim games are building communities – especially with culturally relevant options. Seems like a solid approach to engagement and trust in the Vietnamese market! Hoping for good luck with future draws. ✨
openclaw social
March 6, 2026 at 12:41 amWhat a creative approach to mask organization! I particularly appreciate your wood frame DIY – it’s brilliant how you combined functionality with home decor. This is exactly the kind of practical solution the openclaw community loves sharing for everyday challenges.
jljl 2025
April 4, 2026 at 7:39 pmGreat DIY solutions! The wood frame organizer perfectly demonstrates how thoughtful organization enhances daily routines. Just as well-crafted spaces improve user experience, platforms like jljl 2025 casino show how intuitive design makes any environment more engaging and functional.
jljl55
April 15, 2026 at 2:33 pmInteresting read! Understanding player psychology is key, especially with diverse options like those at jljl55 apk – slots, live games, even sports betting! Quick access via the app is a big plus for seamless play.
Beryl3088
April 24, 2026 at 12:31 pmhttps://shorturl.fm/iMXdm
okfun ph
April 29, 2026 at 4:02 amThese DIYs perfectly illustrate applied design thinking-optimizing a small, daily routine. It’s fascinating how basic organization principles apply everywhere, from home decor to complex systems like real-time analytics. Great reminder that meticulous planning, whether for a craft or checking your okfun ph login account, makes life run smoother!
2jli
May 4, 2026 at 8:22 amI was skeptical about these high-velocity slots until I tried them. The streamlined design at 2jli games delivers smooth live dealer action with transparent payouts, making it a surprisingly efficient choice for serious players seeking instant access to top-tier entertainment without the usual clutter.
luckytaya
May 7, 2026 at 11:39 amJust discovered Lucky Taya offers amazing slots and live dealers! The secure registration process feels safe too. Check out Lucky Taya club for your next thrilling gaming session in the Philippines today!
pinoytimegcash
May 15, 2026 at 3:52 pmWow, scratch cards really tap into that ‘what if?’ feeling, don’t they? It’s fun imagining the possibilities! I was reading about pinoy time gcash online casino and their seamless integration is pretty cool – makes quick gaming access easy! Definitely a modern take on instant wins. 😄
55577
May 18, 2026 at 6:22 amHonestly, the sheer variety listed is impressive, but I wonder about the long-term RTP consistency. Still, the quick BDT withdrawal options are a lifesaver. Check out 55577 ক্যাসিনো for a deeper look!
jilix
May 22, 2026 at 1:36 pmDude, the RTP stuff they mentioned is wild! 🤯 Checking out jilix vip helped me see how the mechanics work. Totally different vibe than just reading the product info! ✨
jililive
June 11, 2026 at 4:09 pmScratch cards are such a fun, quick thrill! Seeing platforms like Jililive streamline the experience with easy logins & apps is great. Check out the jililive app download apk for a modern take on gaming – security & speed are key, right? 😉
oxbetcasino
June 29, 2026 at 3:33 pmAnalyzing the variance patterns here suggests more than just chance. The structure echoes statistical modeling; keep an eye on the payout cycles when checking out oxbet casino legit. Cautiously optimistic!
ExoWatts
July 2, 2026 at 9:37 amGreat content! Keep up the good work!
slotvipph
July 3, 2026 at 4:52 pmDice games are all about understanding probabilities, right? It’s cool to see platforms like slotvip ph com making gaming accessible with easy deposits – even with GCash! Quick withdrawals are a huge plus for enjoying those wins. 😉